Rails, AngularJS (1.5.8), and Webpack — Part 4

Okay. We left off last time actually seeing Angular working with webpack. Things were looking good – in a very basic “Hello World” kind of way. Today, we’re going to create a controller and a component to make an http request to hit up the backend for some data. First, let’s create some data.

Seeding the Database

Heading back to Rails land briefly to create some users and meals. In app/db/seeds.db let’s make a couple of arrays and then use a looping method to create our Users and Meals at the same time.

# app/db/seeds.rb

users = ["Luke", "Han", "Leia", "Obi", "Chewbacca", "C3P0"]
# Our users array from a galaxy from far far away

meals = ["Tattooine Tacos", "Chewie's Chowder", "Princess Pizza", "Darth's Death Stack", "Brain du Jar Jar", "R2's Nuts and Bolts"]
# Our meals array with some interesting looking delicacies

i = 0

6.times do
  UserMeal.create(user_id: User.create(name: users[i]).id, meal_id: 
  Meal.create(title: meals[i]).id)
  i += 1
end

Here we are using our two arrays and a loop to create not only a new User and Meal each go round, but the association between each one too. Now we can run ‘rails db:seed’ in our terminal and our database should be seeded. If we go into our rails console (‘rails c’ in the terminal), and type ‘User.first.meals’, we should see something like this:

=> #<ActiveRecord::Associations::CollectionProxy [#]>

Cool! Our seeding experiment worked and our associations seem to be solid. Let’s take it one step further and get the actual name of our first user’s meal – ‘User.first.meals.first.title’

=> “Tattooine Tacos”

Sweet! We are finished with the backend for now. Let’s get this front end party going!

Creating a Controller

First we’ll create our controller and use Angular’s built in $http service to get data from the backend. We have to use ngInject to inject the $http service into the controller. Then we’ll use $onInit to set up the call to the api. In app/javascript/packs, we’ll create a new file called ‘home.controller.js’. Then we’ll add our controller and export it, so it can be imported wherever we want it.

// app/javascript/packs/home.controller.js

class HomeController {
  constructor($http) {
    'ngInject';
    this.$http = $http;
  }

  $onInit = () => {
    this.$http({
      method: 'GET',
      url: '/users.json'
    })
    .then(res => {
      console.log(res.data)
      this.users = res.data
    })
    .catch(err => {
      console.log(err)
    })
  }
}

export default HomeController;

$onInit is a lifecycle hook that initializes on start up. So our $http call will happen when the HomeController is called upon. The $http call takes one argument, a configuration object consisting of a ‘GET’ method and a url, to make the HTTP request and returns a promise. For a successful promise, we use ‘then’. For an unsuccessful promise, we use ‘catch’. I believe the old standard was ‘success’ and ‘error’ to handle promises.

Now we need to output be able to output our data into a template. Stand alone templates are not used with modules. Instead, we’ll use a simple component.

Creating a Component

Let’s create a new file called ‘home.component.js’ in the same folder as our other Angular files. Then we have to import the HomeController and create the component. Components are very simple, as we’ll see. They basically point to a variable, which we’ll then export. Our component will take three properties: controller, controllerAs, and template. Components could take more properties, but we won’t need anything more for our needs. Our users will be coming to us in an array, so we’ll have to loop over this array to get each user. Angular comes with a very handy ng-repeat, which can be inserted right into the html.

// app/javascript/home.component.js

import HomeController from './home.controller';

const HomeComponent = {
  controller: HomeController,
  controllerAs: '$ctrl',
  template: `<div ng-repeat="user in $ctrl.users">
              <h2>{{user}}</h2>
            </div>`
}

export default HomeComponent;

This should give us what we need. Now we have to import our component to our main app module and we should see something in our browser.

Importing Component into Main App Module

Let’s head over to our meals module and see what we can do. In app/javascript/packs/application.js, we’ll import the home component under our angular and uirouter imports. Then we’ll add our component to the meals module so we can use it in the router.

//app/javascript/application.js

import angular from 'angular';
import uirouter from 'angular-ui-router';
import HomeComponent from './home.component';  // New


const meals = angular.module('meals', [uirouter])
  .component('homeComponent', HomeComponent) // New
  .config(($stateProvider) => {
    $stateProvider
      .state('home', {
        url: '/',
        component: 'homeComponent' // New

      })
  });

export default meals;

I added a ‘New’ comment next to the lines that were added. Notice that we still had to add the component to the module. Then we used the stringified name and added it to our ‘home’ route as a component. Let’s run the servers and see if we have anything.

Remember, we need to run two servers – one for the front end and one for the back. In one tab in your terminal run ‘./bin/webpack-dev-server’ and in another tab, run ‘rails s’. Refresh the browser, click home and….

{"id":1,"name":"Luke","created_at":"2017-10-11T22:21:37.642Z","updated_at":"2017-10-11T22:21:37.642Z","url":"http://localhost:3000/users/1.json"}

{"id":2,"name":"Han","created_at":"2017-10-11T22:21:37.679Z","updated_at":"2017-10-11T22:21:37.679Z","url":"http://localhost:3000/users/2.json"}

{"id":3,"name":"Leia","created_at":"2017-10-11T22:21:37.685Z","updated_at":"2017-10-11T22:21:37.685Z","url":"http://localhost:3000/users/3.json"}

{"id":4,"name":"Obi","created_at":"2017-10-11T22:21:37.692Z","updated_at":"2017-10-11T22:21:37.692Z","url":"http://localhost:3000/users/4.json"}

{"id":5,"name":"Chewbacca","created_at":"2017-10-11T22:21:37.698Z","updated_at":"2017-10-11T22:21:37.698Z","url":"http://localhost:3000/users/5.json"}

{"id":6,"name":"C3P0","created_at":"2017-10-11T22:21:37.705Z","updated_at":"2017-10-11T22:21:37.705Z","url":"http://localhost:3000/users/6.json"}

Nice! We got some JSON! We’re on the right track. Now all we have to do is get the name out of each object. To do that, we’ll have to modify the template in our component ever so slightly.

// app/javascript/home.component.js

import HomeController from './home.controller';

const HomeComponent = {
  controller: HomeController,
  controllerAs: '$ctrl',
  template: `<div ng-repeat="user in $ctrl.users">
              <h2>{{user.name}}</h2>
            </div>`
}

export default HomeComponent;

If you can’t see what was added, no worries. In the

tag we were getting the whole user, which is why we got all that extra JSON. The only thing that was added was a name attribute to the user – {{user.name}}. These things update live, so if we look back to the browser, we should see our Star Wars heroes.

An Aside

This actually took me quite a while to get running. I’m learning as I go and had some trouble understanding how to use $http in the controller. Specifically, how to inject it. Everywhere I looked, people were saying the same thing: outside of the HomeController class, inject the $http service as such – HomeController.$inject = [“$http”];

This did not work. I finally came across a someone’s code with ‘ngInject’ loaded in the constructor. I tried that, and everything worked!

We’ve gone through a lot today and I’m going to leave off here. Next time we’ll separate the $http call into a service, as it should be and see our Chewbacca’s favorite meal. Until then…Cheers:)

Rails, AngularJS (1.5.8), and Webpack — Part 3

Alrighty then. Where were we? I believe we left off in a good place. We installed the webpacker gem, and seemed to have communication between our newly created JS file and our app. Now for the hard part. I’m still learning this stuff myself, so bear with me. We’re going to attempt to use ES6 modules instead of the old way of declaring AngularJS components and such. This style guide is a good starting point to get to know what your components will look like and how they’ll interact with each other.

Setting up the Main Module

The first thing we’ll want to do is setup up our main Angular module in app/javascript/packs/application.js. First we have to import angular into the file so our module knows what it’s attaching itself to. We are also going to export the module, which will allow our webpack to compile it when we run app in the terminal.

// app/javascript/packs/application.js

import angular from 'angular';

const meals = angular.module('meals', [])

export default meals;

Now we have to declare our app in our main html file: app/views/layouts/application.html.erb. So in the body tag, add ng-app=”meals”.

<!DOCTYPE html>
<html>
  <head>
    <title>Meals</title>
    <%= csrf_meta_tags %>

    <%= stylesheet_link_tag    'application', media: 'all' %>
    <%= javascript_include_tag 'application' %>
    <%= javascript_pack_tag 'application' %>
  </head>

  <body ng-app="meals">
    <%= yield %>
  </body>
</html>

Now our app knows that it’s an Angular app and it’s looking for a module called ‘meals’. Let’s add a route with a component so we can actually see something working on the Angular side of the world.

Routing With angular-ui-router

If you’ve built anything with Angular in the past, you’ve most definitely used angular-ui-router. We’re going to install it with yarn. If you don’t have yarn installed, check out the installation instructions here. To install, or ‘add’ as it’s called in yarnish, head over to your terminal and type: ‘yarn add angular-ui-router’. If you check your dependencies in your package.json file, you should see ‘angular-ui-router’ listed.

So let’s see if we can get a route working. In our angular_home.html file, let’s add a ui-view directive.

<-- app/views/application/angular_home.html -->

<ui-view></ui-view>

This will give us an entry point into AngularLand and let us declare routes with $stateProvider in a config function. Back in our application.js file, let’s add a config function and a route. First we’ll have to import the ui-router so we can use all of its goodness. Check it…

// app/javascript/packs/application.js

import angular from 'angular';
import uirouter from 'angular-ui-router';

const meals = angular.module('meals', [uirouter])
  .config(($stateProvider) => {
    $stateProvider
      .state('home', {
        url: '/',
        template: `<h1>Hola Mundo!</h1>`
      })
  })

export default meals;

Ok so here we’re importing the angular-ui-router and chaining a config function onto our module. Angular-ui-router gives us access to $stateProvider, $urlRouterProvider, $state, and $stateParams. In the config function above, we’re using the Arrow function syntax now available in ES6, and setting the state. With a url and a simple template, we should be getting somewhere. Let’s quickly make a link back in angular_home.html so we can see our route is working.

<-- app/views/application/angular_home.html -->

<a ui-sref="home">Home</a>
<ui-view></ui-view>

Run the Webpack and Rails Server Simultaneously?

Now to run webpack, we can’t just run the rails server. We actually have to run the rails and the webpack servers. Back in the terminal, create a new tab in the same directory, then run ‘./bin/webpack-dev-server’. This will compile your included javascript files through webpack. If you’re like me, then you probably got a lot of red errors followed by this line: webpack: Failed to compile.

So something is not letting us load our module. If we scroll up in the terminal, we’ll see that most of the errors say that angular doesn’t exist. But I thought we installed Angular already!! Well, I’m pretty sure that when we installed it with the webpacker command, it installed Angular 4. We need version 1.5.8, which we can easily install add with yarn. Exit out of the webpack server in your terminal. Then type ‘yarn add angular@1.5.8’.

Check out your package.json file and you should see angular with the correct version listed under the dependencies. Now if we try to run the server again – ‘./bin/webpack-dev-server’ – everything should compile (there might be a few warnings, but let’s not worry about those). In your other tab run the rails server command and in your browser go to ‘localhost:3000’. You should see a link that says ‘Home’. Click it, and you should be routed to the home route that we set up earlier. If you followed along, you should see ‘Hola Mundo!’ on the webpage!

To Sum it Up

We are in the Angular business now! In this episode, we’ve connected the front end to our meals app with webpack, added angular-ui-router and AngularJS, created our main module with a route and template, learned how to run the webpack server, and saw our template working in the browser. Next time, we’ll get some functionality going with some http requests to the backend and do something a little more exciting than Hello World Hola Mundo. As always, thanks for reading. I hope this helps someone out there! Until next time…CHEERS:)

AngularJS: We have an Error

If you’re like me and find AngularJS hard to understand, then debugging can be even more difficult. Since I’ve been running into them quite often, I’ve improved upon my abilities to decipher the cryptic errors that pop up in the console. Most of the time, these pesky errors are of the simple human variety: as in, you probably misspelled a word or forgot to add a dependency. In my case today, it happened to be loading my scripts in the correct order. Here’s the error I was receiving:

screen-shot-2017-01-25-at-2-39-47-pm

Lovely, right? Okay where to start. Well, of course now I know, but I’ll take you along through my thought process. First, I checked app.js to see if there were any typos. Nope, sorry sir, move along. Second, as you can see from the error above, the last line says PostService.js.15. So I’ll check out that file, and on line 15 the module is correctly stated. The only other place it could be (since my app is so small) is my index.html file. Let’s head on over there. My scripts were loaded as follows:

screen-shot-2017-01-25-at-2-51-46-pm

These were loaded just before the closing body tag. See anything troubling? Well, I have a service and a controller loading before my app.js file. So when the scripts are loading, my module hasn’t been created yet. Simple, yet frustrating. So just remember to load your app.js script before your other js scripts (and after your angular.js scripts). Oh Angular..some day we’ll be friends.

screen-shot-2017-01-25-at-3-18-47-pm

Stumbling Through Angular: Routes!

AngularJS can be quite difficult to comprehend. Today, while trying to follow along Udemy’s Angular tutorial (hosted by Tony Alicea – it is great by the way!), I ran into some trouble with routing. Angular has built in routing that is very useful, but when things don’t work as you think they should, it can be frustrating. Every programmer in the world has been there. Although banging your head against the wall for a few hours can be quite fun, sometimes it’s best to go take a walk. When you come back, all of a sudden the problem is obvious. In my case, I was really trying to do something simple, but I just couldn’t get it to work.
screen-shot-2017-01-03-at-8-21-56-pm
Setting up the routing is fairly easy, once you  know the basic syntax of Angular. To the left is the file structure for my primitive app. I just wanted to have a main index page with two links. Simple right? Well a few hours later, yes…very. But if I can save anyone else a little time then it was all worth it. First off, we have to let Angular know that we want to use routing in our app. We can either use a link from Angularjs.org or we can download the node modules directly into our app, which I did. In both cases, we add it to our app with a script tag in index.html file. To download, in your terminal type:

‘npm install –save angular-route@1.6.1’

The numbers at the end represent the version of Angular you are running. If you’re not sure which version you’re running, open up package.json and you’ll find it in there.

Now we can add the script to our index.html file (it must be under your angular.js script!).

screen-shot-2017-01-03-at-8-39-31-pm

Note that these are all relative to my index.html file which is in the top of my file directory. Next, in app.js we let Angular know we want to rely on ngRoute. We do this in our module setup like so:

screen-shot-2017-01-03-at-8-32-02-pm

Here we are setting our module up and telling it to include ‘ngRoute’. Now we can use the routing capabilities. I set up two simple controllers to handle the two different links:

screen-shot-2017-01-03-at-8-50-42-pm

Here I’m using the array syntax which basically allows you to minify your files when you go to scale without any hiccups. But that’s for another blog post.  In the body of my index.html file I have two links and a div with a built in Angular directive.

‘ng-view’ tells Angular to look at the url screen-shot-2017-01-04-at-9-04-33-am
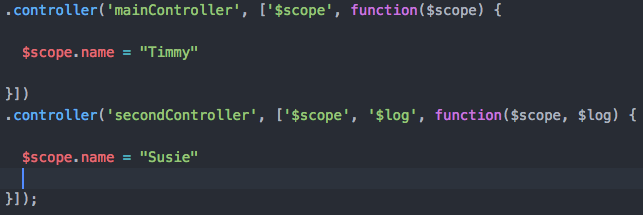
and use the correct template that we set up with our routing. For this exercise I daisy chained all of my controllers and the like to my main module, but for bigger applications we’d have them in their own separate files. Now all we have to do is hook up our routing and we’re all set…

screen-shot-2017-01-04-at-10-16-54-am
So when we go to our main route, ‘/’, we’re expecting our ‘ng-view’ to summon up our main.html file with our $scope attached to our mainController. Welp, that didn’t work. I was getting a ‘404 (Not Found)’ error in my console. My main.html file couldn’t be found.

After searching stackoverflow.com for a  while I thought I found my answer. You can check out this stackoverflow exchange to see what I thought might be going on. Here’s the gist of it…

screen-shot-2017-01-04-at-10-50-12-am

So I tried a few of their solutions and also tried changing the templateUrl to no avail. After taking a much needed walk, I realized that I was giving the location of my html file relative to my app.js file and not my index.html file. So once I changed the templateUrl to reflect that, everything was groovy!

screen-shot-2017-01-04-at-10-27-00-am

Final app.js file

Unfortunately, something was still off when I clicked my links in the browser. The first link was working fine, but the second wasn’t doing anything. Well, technically it was changing the url in the browser, but nothing was going on in my terminal behind the scenes or changing on the web page. The main url is on the left and second link/url on the right.

Something funky was going on with the second link. There were a few characters that were being added – ‘#%2’ – before ‘second’. When I went directly to the ‘/second’ url, everything was cool – my page loaded up correctly. So what was the deal with the extra characters? What’s up Angular?!? I tried changing my href in index.html to include the bang before the ‘/second’. screen-shot-2017-01-04-at-10-55-15-am

And it worked! YAY! I still didn’t know what the heck was going on, but it worked! I thought that Angular, by default, adds a hash to url’s, which is why I included them in the first place. I didn’t know about the bang though. It’s called a hashbang, by the way. There are ways to beautify url’s in Angular, but I’ll leave that to more seasoned Angularites. I hope this will help someone out there! May your journey be smooth and remember – everyone stumbles! Just get back up and keep trekking#!